This chapter explains the technical details of submitting a blog post or tech note (referred to collectively as “posts”) for publication on the rOpenSci website - from drafting in an (R) Markdown template, to submitting for review using GitHub Pull Request infrastructure.
If you plan to use R Markdown to write your post (using index.Rmd as opposed to directly writing it in Markdown with index.md and not executing any code), please install or update blogdown.
The rOpenSci website has a page listing all authors who have contributed to a blog post, tech note, presented in a Community Call, host a co-working session, delivered a talk about rOpenSci’s activities or contribute to some of our projects like the Champions Program. A click on your by-line in a post takes the reader to your author page that has links to your online home, possibly your social media or GitHub profile(s), and a list of all the content you’ve authored on our site. For staff and leadership team members, editors for software peer review, members of our Code of Conduct Committee, and participants of our Champions Program, their rOpenSci title is also listed on their author page.
3.3.2 How?
If you don’t already have an author page, create a folder called yourfirstname-yourlastname in your local copy of roweb3/content/author/. You can have accents, middle initials, or hyphens appear in your name if you name your folder appropriately. That can be tricky so we have examples below.
In that folder, create a file called _index.md with information about your online presence. You can copy this template below (or get it via roblog after installing it via install.packages("roblog", repos = "https://dev.ropensci.org") ).
author-file-template.md
---name: Author namelink: website URL or other online presencemastodon: Mastodon full URL to profiletwitter: Twitter usernamegithub: GitHub usernamegitlab: GitLab usernamekeybase: Keybase IDorcid: ORCID IDimg: link to picture to be saved in themes/ropensci/static/img/community (if not provided, uses GitHub profile picture)---
At minimum, provide your name and a link or your Social Media, GitHub, or GitLab username. Add your usernames or ID’s without the “@” or the “https:…”. The link field can be your personal website URL, for example.
For an example of how to name the folder with an accent and initials, see this author file that generates Richèl J.C. Bilderbeek’s author page. The folder name must include accents, initials with periods, and hyphens for spaces, in order to link to their blog content.
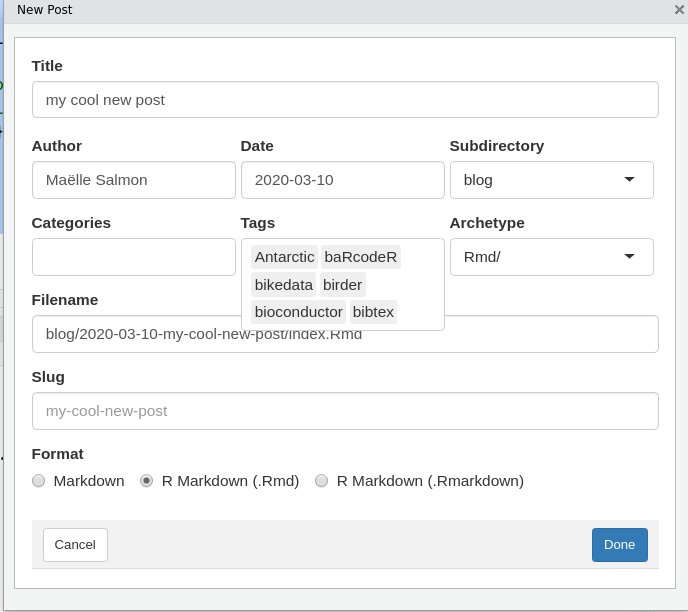
The blogdown New Post RStudio addin creates the post draft in the correct location and fills the post YAML based on metadata you’ll have entered.1
Install whoami and blogdown (install.packages(c("whoami", "blogdown"))) (blogdown version should be at least 1.6.0).
Install Hugo (to preview the post): blogdown::install_hugo("0.133.0") (version recorded in netlify.toml of the roweb3 repository).
Re-start R.
In RStudio, open the forked roweb3 project.
Create a new post by running Addins > New Post or blogdown:::new_post_addin().
Leave “Categories” blank (and ignore in the file created)
Enter a title, no need to worry about title case at this stage.
Enter your name if whoami wasn’t able to guess it.
Choose the correct date.
Enter a new slug if the default one is too long.
Choose “blog” as a Subdirectory from the drop-down menu.
Choose an Archetype, Rmd or qmd or md, from the drop-down menu.
Also choose the correct Format: .Rmd if Rmd, Markdown (.md) if md. Never choose .RMarkdown.
Ignore Categories.
Select “tech notes” tag if this is a tech note
Select any other relevant tags and/or create new ones
Click on “Done”, your post draft will have been created and opened.
3.4.2 Manually
Create a folder YYYY-MM-DD-slug/ (e.g. 2020-01-20-rorcid/) under /content/blog/ Your post source and its images should live in /content/blog/YYYY-MM-DD-slug/.2
R Markdown template is to be saved as /content/blog/YYYY-MM-DD-slug/index.Rmd. It will need to be knit (RStudio knit button, or blogdown::build_site(build_rmd = <path_to_file>)). Add both index.Rmd and index.mdto your PR.
Quarto template is to be saved as /content/blog/YYYY-MM-DD-slug/index.qmd. It will need to be rendered. Add both index.qmd and index.mdto your PR.
Markdown template is to be saved as /content/blog/YYYY-MM-DD-slug/index.md.
3.5 Adding content
3.5.1 YAML
The YAML sets the metadata for a post. This is the YAML from our post template, with comments to explain some components.
Note: The New Post Addin automatically creates a categories component, but you should ignore or remove this and use tags instead.
slug: post-templatetitle: Post Title in Title Casepackage_version:0.1.0author:- Author Name1- Author Name2date:'2020-03-10'tags:- Software Peer Review- packages- R- communitydescription: A very short summary of your post (~ 100 characters)socialImg: blog/2019/06/04/post-template/name-of-image.pngsocialAlt: Alternative description of the imagesocial: A post about blabla by @[email protected]!editor:~
If you need to add an alert box at the beginning of the post, use the preface field with the Markdown syntax. See for instance this post with a preface about a series of post (source)
preface:"some alert"
3.5.1.1 Subject tags
Add tags to the YAML of your post to make it more findable. Browse our page that lists all tags in use and re-use an existing tag rather than creating a new one e.g. ‘packages’ exists, so use that, rather than ‘package’.
For a post about your peer-reviewed package, use ‘Software Peer Review’, ‘community’, ‘packages’, the package name, and any others you see fit.
3.5.1.2 Social media metadata (optional)
Delete description, socialImg and socialAlt YAML fields if you don’t use them.
3.5.1.3 Default social media text (optional)
Provide default text for social media post (Mastodon and LinkedIn) when a reader clicks the “Share on Mastodon” button by replacing the value of social: "A post about blabla by @[email protected]!". Consider including your (and your coauthors) Mastodon handle(s) (@[email protected]) in the post text to ensure you get notified when someone shares your post.
3.5.2 Images - General
Images can either be external or created in rmarkdown. Regardless of how images are included, they should all contain alt text and consider the following features.
If you include a picture with text (like a comment on a post or a phrase on a wall), include the text you want to highlight from that image in the alt-text.
Image features
Consider transparent backgrounds as the blog background is not white (hex logos etc. will look better this way)
Keep images < 1 mb
Large images can be compressed/optimized with tools like
This section refers to images that are not generated from R Markdown. If you want to generate images from R Markdown use our R Markdown template and see next subsection.
File location
All images go in the same folder as your post source (/content/blog/YYYY-MM-DD-slug/) (do not link to external services like imgur). To reference them in your post, use name-of-image.png.
Insert an image
Insert an image with either figure or imgtxt short codes
If a post does not exist in English, you must create “language-specific resources”: for a post in Spanish, an image called image.png must be renamed image.es.png and be referred to like that in the figure shortcode: {{< figure src = "image.es.png" alt = "informative description">}}
3.5.4 Images - Rmd-created
File location
When using our R Markdown template the knitr hook in the setup chunk actually creates the necessary Hugo shortcodes. Therefore you don’t need to worry about paths.
Image details
In the chunk producing a figure, use the hugoopts chunk option to control the alt text and other elements. hugoopts is a named list that can have all elements described in the documentation of the Hugo figure shortcode except for title.
```{r chunkname, hugoopts=list(alt="alternative text please make it informative", caption="this is what this image shows, write it here or in the paragraph after the image as you prefer", width=300)} plot(1:10)```
This chunk above produces a figure with “alternative text please make it informative” as alternative text, “title of the image” as title, “this is what this image shows, write it here or in the paragraph after the image as you prefer” as caption, and a width of 300 pixels.
3.5.5 Citations and footnotes
To add citations, refer to them in the body of your post as footnotes:
Citation of the primary literature[^1].
Citation of an R package[^2].
Citation of a website[^3].
And list your sources at the bottom of your post:
[^1]: Sciaini, M., Fritsch, M., Scherer, C., & Simpkins, C. E. (2018). NLMR and landscapetools: An integrated environment for simulating and modifying neutral landscape models in R. Methods in Ecology and Evolution, 9(11), 2240-2248. <https://doi.org/10.1111/2041-210X.13076>
[^2]: Elin Waring, Michael Quinn, Amelia McNamara, Eduardo Arino de la Rubia, Hao Zhu and Shannon Ellis (2019). skimr: Compact and Flexible Summaries of Data. R package version 2.0.2. https://CRAN.R-project.org/package=skimr
[^3]: Hugo static site generator. https://gohugo.io/
3.5.5.1 Finding citations
To get the citation for an R package, run citation("packagename").
To get the citation for an article, you can use the RStudio Addin for rcrossref, or get the citation from a paper’s DOI by running e.g.
rcrossref::cr_cn("10.1111/2041-210X.13076", format="text", style="apa")

[1] "Sciaini, M., Fritsch, M., Scherer, C., & Simpkins, C. E. (2018). NLMRandlandscapetools: An integrated environment for simulating and modifying neutral landscape models inR. Methods in Ecology and Evolution, 9(11), 2240–2248. doi:10.1111/2041-210x.13076"
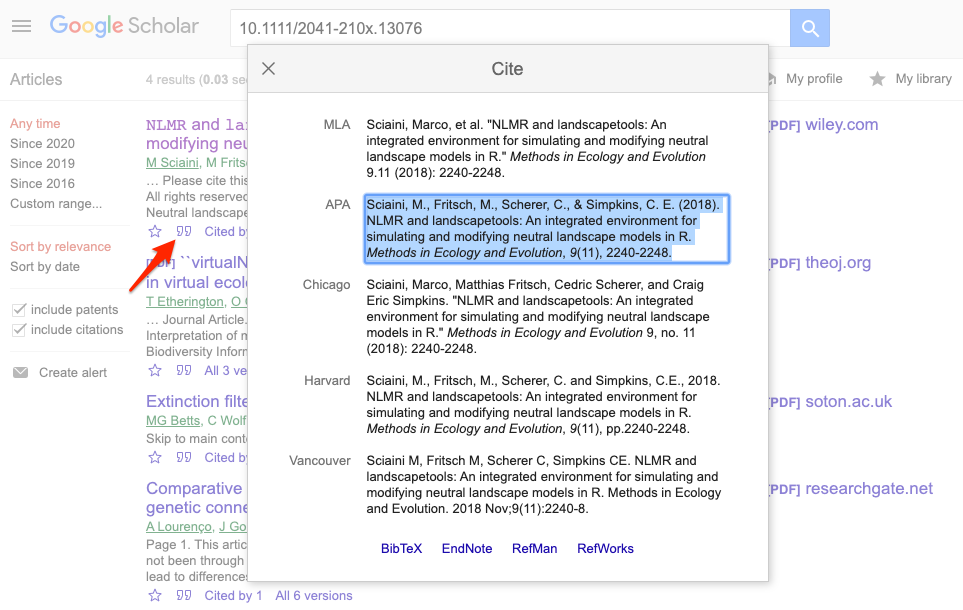
To get the citation for an article in Google Scholar, find the article, click the quote symbol (in search results under the article) to open the “Cite” window, and copy the APA style text.
3.5.6 Referencing social media posts
We no longer recommend embedding social media posts directly, as posts can always be deleted and the context in the blog post is lost when that happens.
If you want to use e.g. striped tables, add {.table .table-responsive .table-striped} right after the last line of the table.
Header | Other Header | Another Header---------|----------------|-------------------Value 11 | Value 12 | Value 13Value 21 | Value 22 | Value 23Value 31 | Value 32 | Value 33{.table .table-responsive .table-striped}
3.5.9 Examples
Comparing the raw Markdown to the live posts in these examples might be helpful.
A blog post about a package that has passed software peer review. Compare raw markdown with the live post.
Please discuss your post’s language with blog editors!
Our website’s default language is English so only posts in English are called index.md.
For translating a post, create a file in the same folder as the original post but called index.<two-letter-language-code>.md, for instance index.es.md. Translate tags, title, description too.
For a post in a single non-English language omit the index.md file and only use the index.XX.md file using the appropriate language code (e.g., index.es.md for a Spanish-only post).
Add an author file in content/author/author-name/_index.<two-letter-language-code>.md even if it only duplicates content/author/author-name/_index.md.
If you are writing the first blog entry for a particular language (yay!), please ask blog editors to notify the website team so we can add translation for the blog infrastructure (such as “Share this page” and similar phrases).
Feel free to checkout the rOpenSci translation guide for how we are translating rOpenSci material in general.
In R Markdown wrap Hugo shortcodes between html preserve tags as shown in the template.
Instead of using html widgets (DT, leaflet, etc.), include a screenshot and use the link option of the Hugo figure shortcode to direct readers to an online version of the widget.
All languages Avoid Latin phrases such as “e.g.” (for instance) or “i.e.” (that is to say). Use phrases in the language of your post instead.
English - Use title case for the title of your post; use sentence case for headings inside the post.
Non-English - If using English words, use italics for the word in English and translate directly in parentheses the first time it is mentioned
3.8 Pre-submission checks
3.8.1 Knit post
If using the R Markdown template, knitting index.Rmd (RStudio knit button, or blogdown::build_site(build_rmd = <path_to_file>)) will generate index.md. Commit both index.Rmd and index.md.
ro_lint_md() to check and enforce use of complete alternative descriptions for image, of relative links to rOpenSci website, of Hugo shortcodes.
ro_check_urls() to check for URLs that might be broken
3.8.3 Author Checklist
Pick the appropriate checklist for your post and ensure you checked everything off. Notice the copy-paste button at the top-right corner of the list.
3.8.3.1 Posts on peer-reviewed packages
* [ ] I have read the Content Guidelines.* [ ] I have read the Technical Guidelines.* [ ] I used or followed the R Markdown or Markdown template.* [ ] I have followed the Style Guide.* [ ] I created or updated my author metadata with correct folder name.* [ ] I have added relevant tags after browsing existing tags (including "community" tag).* [ ] I have added the "tech notes" tag if this is a technote.* [ ] I ran `roblog::ro_lint_md()` on index.md (optional).* [ ] I ran `roblog::ro_check_urls()` on index.md (optional).* [ ] I ran a spell-check on index.md.* [ ] I have added the tags - Software Peer Review, my-packagename.* [ ] I have added the package-version YAML tag.* [ ] I have added acknowledgement of the reviewers' work (with links to reviewers).* [ ] I have added a link to the software peer review thread.
3.8.3.2 Other posts
* [ ] I have read the Content Guidelines.* [ ] I have read the Technical Guidelines.* [ ] I used or followed the R Markdown or Markdown template.* [ ] I have followed the Style Guide.* [ ] I created or updated my author metadata with correct folder name.* [ ] I have added relevant tags after browsing existing tags (including "community" tag).* [ ] I have added the "tech notes" tag if this is a technote.* [ ] I ran `roblog::ro_lint_md()` on index.md (optional).* [ ] I ran `roblog::ro_check_urls()` on index.md (optional).* [ ] I ran a spell-check on index.md.
3.8.4 Local preview
If you wish to preview your post locally, as it will appear in our site, you must install Hugo. To install, refer to Hugo docs or run blogdown::install_hugo() using the version recorded in netlify.toml.
Note: You can also preview your blog post online through the pull request before the final submission.
Then run hugo serve or blogdown::serve_site() in the repo directory to start a local server on http://localhost:1313 (or another one indicated by blogdown).
Note: If you are used to using hugodown you can use it instead to serve the website.
The version of Hugo used by the rOpenSci web server is defined in netlify.toml.
When this preview looks good to you, you should submit your post as a pull request.
3.9 Submit draft post
3.9.1 Create draft pull request
Open a draft pull request (PR) from your fork (using the web interface, see step 8 for creating a draft), or usethis::pr_push() that will save you some work and that will in the end open the same web interface where you can choose Draft PR in the last step)
If you opened a PR instead of a draft PR, you can convert it to a draft by clicking on “Still in progress? Convert to draft” on the right panel under “Reviewers”.
3.9.2 Add checklist
In the first comment of your pull request submitting a post, please copy-paste the checklist corresponding to your post and check off the items.
3.9.3 Preview online
From the PR, Netlify will start building the new version of the site within seconds and you can preview your changes to make sure everything looks as intended. Otherwise push additional fixes till things look right.
3.9.4 Submit post
Mark the draft PR as ready for review at least one week prior to the planned publication date. When you get approval for a post idea you’ll be told who to ping as your reviewer.
If you don’t use RStudio you can still use the addin, but the new post will be opened in the editor returned by getOption("editor"), that you might need to configure.↩︎
In Hugo speak, we’d say your post is a leaf bundle.↩︎


3.5.1.2 Social media metadata (optional)
Delete
description,socialImgandsocialAltYAML fields if you don’t use them.